My daughter has recently started playing with DUPLO blocks pretty consistently, which has me thinking about LEGO—the toy of my youth (and hopefully her’s in a couple of years, too!). In some ways, LEGO is an ideal medium for exploring fractals. They are relatively cheap and ubiquitous, forgiving of errors as they pop right apart, and have give a wonderfully tactile experience. I suspect that they might be a really interesting tool to use in the classroom, as well, but I haven’t really thought much about that yet.
When I was first struck with the idea of making fractals out of LEGO, I figured that a lot of people must have had a similar idea, and went out looking for examples on the internet. A quick search for “LEGO fractals” finds a couple of models, including a rather nice Menger sponge, but there seem to be surprisingly few such fractals made from LEGO. Moreover, most of the examples that I could find used techniques that I found displeasing, both aesthetically and mathematically—but before we get to that, we need a little background.
What is the Idea?
While there is no exact mathematical definition of what a fractal is,1In reference to the definition of a fractal, Mandelbrot states that it might be wise to “…leave the term ‘fractal’ without a pedantic definition, to use ‘fractal dimension’ as a generic term…, and to use in each specific case whichever definition is the most appropriate.” (The fractal geometry of nature, W.H. Freeman and Company, New York, 1983, p 459) they are often related to some kind of iterative process. For example, practical models of a Sierpinski triangle can be constructed from an equilateral triangle in at least two different ways.
The first method starts with an equilateral triangle and repeatedly subtracts smaller and smaller triangles. Specifically, the original triangle is divided into four equal triangles and the middle triangle is removed. Each of the remaining triangles is then divided into four equal triangles and the middle removed. This process is carried on indefinitely.2While the canonical Sierpinski triangle is equilateral, though the same technique could be applied to any triangle: bisect each side, remove the triangle formed by the midpoints, and iterate. The first five steps are animated below.

The second technique also starts with an equilateral triangle but repeatedly adds new triangles to the construction. Three identical triangles are grouped together into a larger triangle. Then three copies of the resulting figure are grouped into a larger triangle. And so on. Again, the first five steps are animated below.

In some sense, the first method is more mathematically accurate, as (in a technical and abstract manner) the object obtained by continuing the process indefinitely is the Sierpinski triangle. Moreover, an artist could start with an arbitrarily large block of material for the first iteration, and produce a finished work with details almost as small they like, assuming reasonable competence with their tools. From an aesthetic point of view, this is attractive. However, sculpting, folding, carving, or otherwise constructing a fractal in this way is somewhat limited, in that not all media are amenable to removing arbitrary pieces—wood or marble might work in the hands of a skilled artist, but LEGO (for instance) probably won’t work.
The second technique produces ever larger constructions as new iterations are added to the original construction, and the object produced after an indefinite number of iterations will have a very different kind of mathematical flavor from the fractal that it is meant to model. The cost of construction is also exponential with regard to the number iterations one wishes to display. On the other hand, the construction technique is relatively simple: produce a large number of “first iteration blocks,” then attach them to each other according to the appropriate algorithm.
As an example, consider the LEGO Sierpinski tetrahedron (a three-dimensional analog of the two-dimensional Sierpinski triangle) shown below. The construction is straight-forward: four 2×2 bricks are put together to form a lopsided pyramid with a roughly triangular base. Four of these models are then joined into a larger pyramid, and so on. Given enough 2×2 bricks, the model could be made quite large, though I suspect that it would eventually become too heave to support itself.
So What?
The goal is not just to build fractals using LEGO, but to do it in a manner that is both practical and mathematically robust. To that end, here are the rules (note that some of these are somewhat arbitrary, and depend on my own sense of aesthetics more than anything else):
-
Modularity: In the Sierpinski tetrahedron above, the second iterate is constructed from four copies of the first iterate, the third iterate is constructed from four copies of the second iterate, and so on. No pieces have to be removed or added or changed to produce larger models—we just have to find more pieces. This contrasts with most of the models that I have found online (this Menger sponge completely lacks modularity, and this snowflake requires some work to connect horizontally adjacent iterates—note that this is not a criticism in either case; it just isn’t what I want).
-
Proportionality: Most of the fractals that I have studied occur as the self-similar attractors or invariant sets of iterated function systems. In this setting, we generally expect to see squares (not general rectangles), circles (not ellipses or ovals), or cubes (not rectangular prisms). In general, the presence of a rectangle that is not a cube is indicative of a function in the system which squashes things down in one direction more than in another direction, which is a characteristic of a self-affine, rather than self-similar, system. In order to satisfy my own sense of aesthetics, I insist that my basic building block be a cube that has the same measurements in three dimensions. The basic 2×2 LEGO brick has a height to width ratio of 3:5, while a basic 2×2 LEGO plate has a height to width ratio of 1:5. This means that the smallest possible cube built from LEGO is composed of a 2×2 brick and two 2×2 plates:

-
Availability of Pieces: There are some really interesting LEGO pieces that allow for a huge variety of construction methods, such as SNOT techniques which allow one to change the orientation of the studs. These techniques have the potential to be quite powerful in the construction of LEGO fractals, but often rely on hard-to-get pieces. My goal is to build models from basic, easy-to-find pieces. They should be the kind of thing that might just be lying around the house or in a big box of bricks that one finds at the local thrift shop. I’ll make a few exceptions in the spirit of SNOT in order to join certain blocks of bricks together, but I’ll try to keep this to a minimum.
-
Durability: In the Sierpinski tetrahedron above, two of the bricks in the basic module are joined to the brick above with one stud each. This is not a very stable arrangement, as the pieces can twist around a bit and easily come apart. This can be fixed by adding a few pieces:
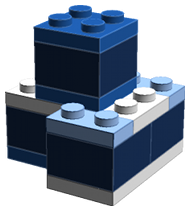
While there will be some structural problems with later iterations (again, there will only be one stud holding modules together), this modification strengthens the basic building block and has the advantage of satisfying the proportionality requirement of point (2), above.
A Practical Example with Instructions
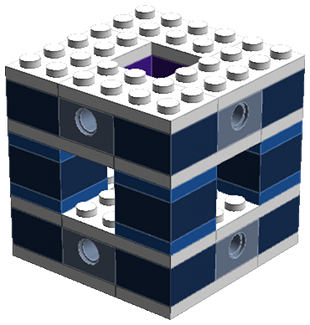
My first model is an attempt to build a better Menger sponge. The basic module is picture below (color coded for your convenience), and a parts list and model file for the LEGO Digital Designer are available.
Step 1
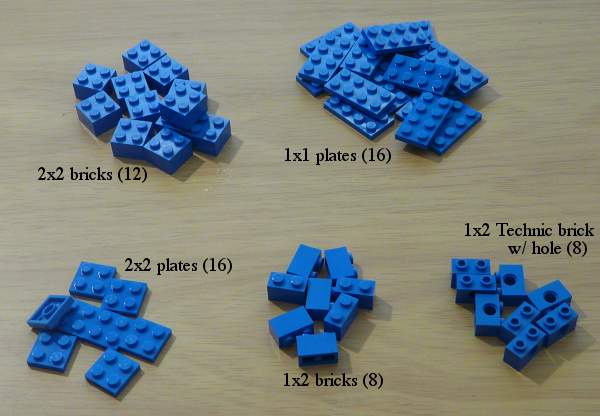
The parts required for one module are shown below. To make the second iterate, you will need to multiply all of the quantities by 20. To make the third iterate, you will need to multiply all of the quantities by 400. And so on. Also note that friction pegs will be needed to join the modules together (see the parts list for details).
Step 2
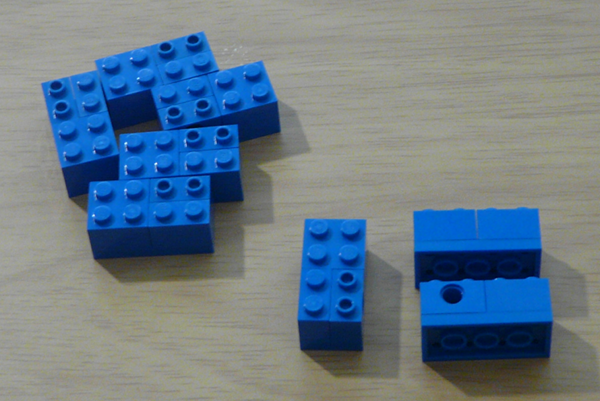
Start with a 2×4 plate. Stick a 2×2 brick to one side of the plate, and a 1×2 brick and 1×2 brick with a hole on the other side. Make a total of 8 of these, making sure that you place the hole consistently—when you put these guys together, they will all need to face out. My solution was to always place the 2×2 brick on the right, and the brick with a hole on the front left.
Step 3
Arrange four of the constructions from the previous step into a square with a square space in the middle so that the holes in the 1×2 bricks are centered on each side and facing out. Use four more 2×4 plates to hold everything together. You’ll make 2 of these using the parts from step (2).
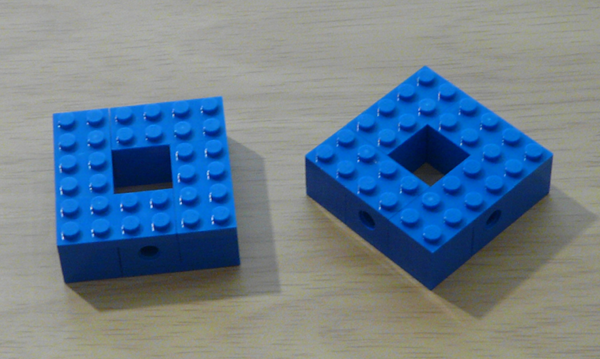
Step 4
Take one of the constructions from step (3). Put a 2×2 plate on each corner, then a 2×2 brick on each of these, and finish it up with a another 2×2 plate.
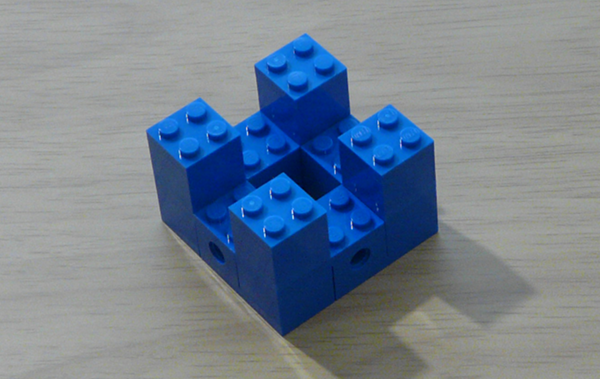
Step 5
Finish the module by attaching the remaining construction from step (3) to the construction from step (4).
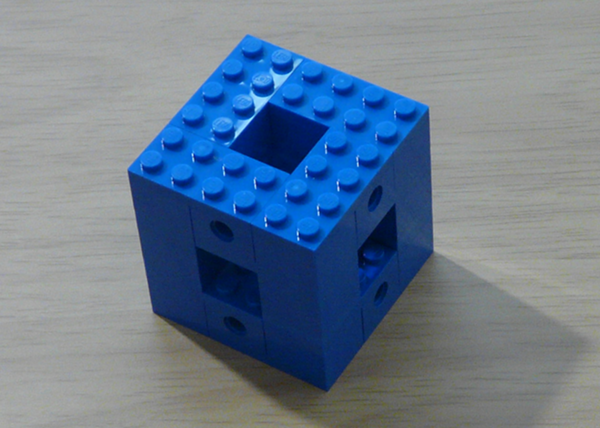
That’s it! The module is complete.
The Next Iterate
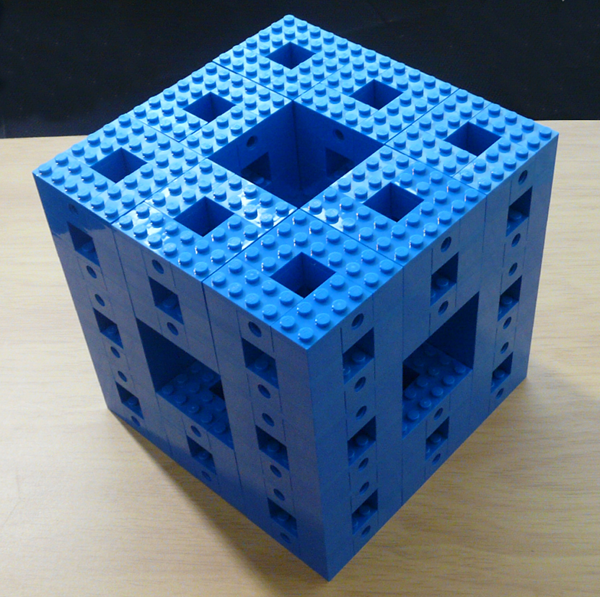
The above model represents the first iterate of the Menger sponge. To build the second iterate, you will need 32 friction pegs and 19 more copies of the the basic module shown above. The joining technique and a completed model are shown below.
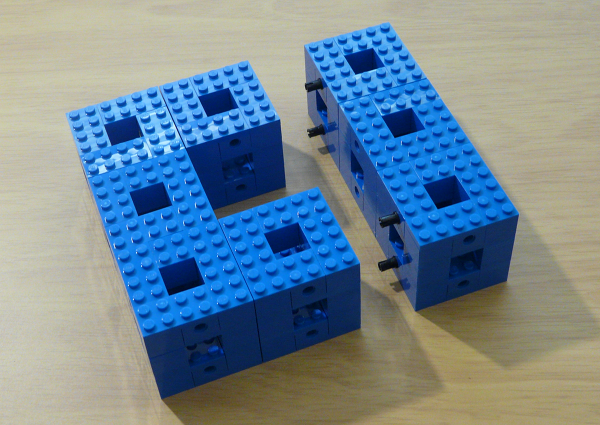
Other Models
For those that are interested, I have designed some other fractal modules, but have not yet built any of them. LDD files for some complete ideas can be found in a .zip archive. I’ve had a few other ideas, but haven’t yet figured out how to put them together—if anything comes of them, I’ll make a note of it on this website somewhere. And if anyone bothers to build any of my designs, I would love to see them.
